Friday, 31 October 2008

Some Pumpkin Pie and Ruby Red Happiness...

Same old story...all the stuff from Kristina's latest colour inspiration were still scattered about my desk...so I used them, again!


It is another simple card. I've used the Swiss Dots cuttlebug folder on the Pumpkin Pie layer. The main image has been stamped onto watercolour paper in Black Stazon, and watercoloured with an aquapainter and classic ink. I have highlighted the flowers with Crystal Effetcs, because I really enjoy doing that! The Sage Shadow ribbon is from the District ribbon originals pack.


I have a cold, so I'm gonna go curl up on the couch and watch K-PAX.

See ya,
Sam.

PS. Happy Halloween!

Wednesday, 29 October 2008

Oh, So Lovely

I love it when Kristina posts her color inspirations on a Wednesday...it means I actually have time to sit down and play (sometimes ;-).

This week's color inspiration colours are very beautiful:


My submission is only a simple card, but it took a good bit longer to make than I would have liked. I think my mojo is out visiting, but I kept going without it anyway:


The background cardstock is Ruby Red. I have stamped it with the crosshatch stamp in the 'Oh, So Lovely' stamp set. Then there are a whole bunch of layers, including a piece of cardstock vellum. The main image is also from the 'Oh, So Lovely' stamp set, and it has been stamped in Stazon onto Whisper White textured cardstock.

I have coloured the poppies using Stampin' Up! Watercolour Wonder Crayons. You will have to believe me when I tell you the stems of those poppies are Sage Shadow. I have also applied Crystal Effects to the flower heads.

Thanks for looking,
Sam.

A little Cirque-inspiration

We went to see Dralion here in the ACT last night. It was my first ever Cirque du Soleil experience, and WOW...it was amazing! Fantastic skill, wonderful choreography, gorgeous costumes, fabulous music, the list goes on...

So I've got cirque on the brain, and what better source of inspiration:


Oceane, goddess of water, queen of movement (my abs look a bit like hers ;-)...I WISH):


And then there is beautiful Azala, goddess of air, guardian of the sun:


But my favourite act was the single hand-balancing. This young girl balanced on one hand for AGES, and contorted herself into all sorts of shapes...she could eat dinner with her toes while lying on her belly watching telly if she felt the whim to do so. INCREDIBLE!


I hope you get to enjoy Dralion too...I can not wait until Cirque bring their next show to Canberra!

Have a lovely day,
Sam.

Monday, 27 October 2008

The Third Christmas Project

As promised, here are some pics of the third Christmas Project made at my class last week:


We were shown how to make these little two pocket bags out of a single sheet of 12 x 12 DSP at our last regional training event. I haven't seen any online instructions for them, but if you know of some please let me know and I'll post a link.

The holes for the bag handles are punched using the crop-a-dile, and the outer four holes have been set with Classy Brass Jumbo Eyelets. The ribbon for the bag handles is Real Red 3/8" Grosgrain, and the tags are stamped in Real Red classic ink using the 'Tags for All' stamp set in the current spring Mini (which ends at the end of November...so don't miss out on these groovy stamps).

If you are interested in coming along to one of these classes, just drop me a line at: navarino@yahoo.com and I will email you out the details of the next class. We usually do two cards per class, but for the last one we did three x 3D Christmas projects.

The class is usually held on a Wednesday night from 7:30 pm, although if enough people were interested I could negotiate another date/time. My house is in Kambah, ACT (southside). I charge $10 and this includes all materials for the cards or projects, including SNAIL adhesive, and envelopes for cards. I also provide tea, coffee and hot choc, and some light supper...which may even be a chocolate cake ;-).

Back tomorrow...
Sam.

PS. A big thank you to my blog buddy Karen in NZ for letting me know there is a tute on SCS for these Double-Pocket Bags!

Sunday, 26 October 2008

Christmas Trees from Gemma

I thought you might like to check out some wonderful cards made by one of my lovely customers, Gemma:


Her cards are so lovely and bright. I especially love the little extras she includes on her cards, such as Crystal Effects applied to look like tinsel...such a cool idea!!

Thanks so much for sharing these with me Gemma.
Sam.

Christmas Projects class

Last Wednesday I held a Christmas projects class at my house, and these are two of the three projects that we made:


A boxy bag....the idea and instructions for which I got from Jody...thank you! The one on the left is essentially the same as Jody's boxy bag, but instead of sticking the side flaps at right angles, I have let them sit out at about 45 degrees to give a more baskety-bag look.

I've used Real Red cardstock, and decorated it with stamps from the Snow Burst stamp set, inked in Real Red Classic Ink. The DSP around the bottom of the boxy_bag is from the Dashing pack (LOVE this paper :-).

The feature embellishment on the front is a circular piece of chipboard which has been covered in Old Olive textured cardstock. Then there is a scalloped circle of Real red cardstock, then a large circle of Old Olive, then a small circle of Very Vanilla. The 'May you merry be very' sentiment is from the Merry, Merry stamp set.

I've punched small double holes across the top of the bag in the front and back, inserted eyelets and tied the bag with Gold Cord.

The second project we made was a bow. The instructions for making these bows can be found on Splitcoaststampers:


Again, we used Dashing DSP. These bows looks so effective, and really are not that time consuming to make.

We did make a third project, but I haven't photographed it yet as I got sidetracked today...sorry! First we went along to the Canberra Airport Open Day (GREAT fun), and then spent HOURS walking around the Camping, Outdoors and Leisure show at EPIC.

The best part of the whole day was the free ride we got in the RAAF hot air balloon. We were on the first ride up, and as it only operated for about 5 rides (due to the wind) we were very fortunate!


We also got to tour the Virgin Blue aircraft you can see in the photo above. Mr 2 was MOST impressed with the little window shutters, tray tables, hostess buzzer and light switches...he could have played in there for HOURS...small things eh?

Hope your day was fun too!
Sam.

More Dashing Pressies

This is the second project we made yesterday. They are pretty much the same as my earlier version of Dashing Christmas pressies:


The background cardstock is Real Red. In the first example I have decorated the background cardstock using the Gifts Galore wheel in Real Red classic ink. In the second example I have used the Christmas tree from Fun and Fast Notes. The second layer is Whisper White and is mounted up on dimensionals. In the second example I have distressed the edges. Then there is a layer of Real Red, and finally a layer of Whisper White.

The gifts have been punched out of Dashing DSP using the 1 1/4" and 1 3/8" square punches. The ribbons on the gifts are thin strips of Real Red cardstock. The bows are stamped in Real Red ink using the bow from the Big Bold Birthday set.

The Merry Christmas greetings have been stamped in Basic Black ink. The first is from the Occasional Greetings stamp set and the second is from the Season of Joy stamp set.

And that's it! I still have some photos of the things we made at my class here on Wednesday night to show you, but we are about to go off to the Canberra Airport open day with the kids, so it will have to wait for this afternoon!

Chat later,
Sam.

Saturday, 25 October 2008

Dashing Christmas Trees

I just wanted to show you one of the cards we made at a workshop today:


The background cardstock is Real Red. The next layer is Old Olive textured cardstock. The next layer is Real Red and is mounted up on dimensionals. Then there is a layer of Confetti White.

The Christmas Trees are made using the Dashing DSP, and I have sponged Old Olive ink along their edges to give some depth. The 'feature' tree is mounted up on dimensionals. This tree is decorated with a star punched from Brushed Gold cardstock, and three baubles also punched from Brushed Gold carstock using a 1/4 inch circle punch. The star is mounted using dimensionals and the baubles are mounted with glue dots.

The tree trunks are Chocolate Chip cardstock that I have distressed using the tips of scissors. The 'Merry Christmas' greeting is stamped in Real Red classic ink and is from the Season of Joy stamp set.

I'll take a photo of the second card tomorrow!

Have a great weekend.
Sam.

Sunday, 19 October 2008

Have a Dashingly Merry Christmas

I've been tinkering again this morning. I have a class and a workshop to prepare for this week...but I managed to squeeze this little blog offering in too ;-).


The colours are Real Red..yes really!..and Whisper White (the bottom WW layer is textured). The pressies are punched from the Dashing DSP using the small and large square punches. The 'bow' is from the 'Big Bold Birthday' stamp set, and the 'Merry Christmas' greeting is from Occasional Greetings stamp set. And that's it! I've done a bit of paper piercing around the main frame, and that layer is mounted up on dimensionals. A simple card.

While I was taking the pic, I was admiring my vege patch...so I thought I'd share it with you. We have lots of strawberries on the way...YUMMY!


...and enough continental parsley, thyme, marjoram, chives and oregano to keep me in Spag Bol for the next 12 months. You can't see them all here, but doesn't it look so green and tasty?


While I'm off the craft track...we went to the beach yesterday for a bit of sunny, sandy, salty, Saturday fun:


I was playing with my polarising filter and my 50 mm lens. I had some success...a significant number of blurries...but you get that.

Hope your weekend has been fun too!
Ciao, Sam.

Saturday, 18 October 2008

A Tricky Color Inspiration!

I'm not afraid to say that I found Kristina's latest Colour Inspiration REALLY HARD! REALLY, REALLY HARD!!


I measure 'HARD' by the state of my workspace at the end of creating...and suffice to say this was one of the hardest...


WOT A MESSY SAMMY!

Anyhoo....I got it done, and I think it is even within deadline.


The background cardstock is Whisper White. The next layer is textured Wild Wasabi (still loving textured ;-). The Rose Red ribbon is from the Fairy Tale ribbon originals set. The 'You make me SMILE' sentiment is from the 'Anchored' Rub-Ons pack. I've then mounted a large square aluminium edged tag up on dimensionals. The next layer is Bashful Blue cardstock which has been punched out with the scallop punch and pierced around the petals. Then there is a piece of So Saffron cardstock which has been crimped and punched out using the 1 3/8" circle punch, then there is a layer of Rose Red cardstock, punched out using 3/4" circle punch and mounted up on dimensionals, and last...but certainly NOT least, is the smiley face Rub-On, from the 'A Perfect Day' pack in the current Spring Mini Catalogue.

Have a great day.....we are going to have a top of 25 degrees celcius here...BLISS!

Sam.

Wednesday, 15 October 2008

Three Black Cats

We don't celebrate Halloween in Australia...well, no one in my neighbourhood seems to at any rate...but I really wanted to participate in Shelli's Creative Challenge. Because it is not widely celebrated we don't have much in the way of Halloween-type stamps and embellishments...so I've been pondering this problem for some time. Then, as I was browsing through my Google Reader the other day I came across this amazing card by Karen Thomas....where she has used punch-art to get the Halloween theme happening. Such a clever girl she is!!!

Soooooo, to cut a long story short, I have spent this afternoon mucking about with my punches and have come up with this card. I am really pleased with the end product...and I don't think you can get much spookier than three black cats...can you?


All products used are from Stampin' Up! The background cardstock is Basic Black Textured Cardstock (I have a 'thing' for textured cardstock at the moment...LOVE IT). The next layer is Lavender Lace, and has been mounted up on dimensionals. Then there is a Pumpkin Pie layer that has been crimped.

The black fiber is from Stampin' Up!'s retired Neutrals Fancy Fibers pack. The 'Happy Halloween' sentiment is from the Occasional Greetings stamp set, and has been stamped in Basic Black ink, in two parts (using the Stamp-a-ma-jig to align), so that it will fit inside the Designer Label punch. The Hodgepodge frame is from the Styled Silver set, currently available in the Australian Spring Mini Catalogue.

The three square boxes are made using Lavender Lace and textured Whisper White cardstock, and are punched out using the 1 1/4" and 1 3/8" square punches. These squares are also mounted up on dimensionals.

My three black cats are made using a variety of Stampin' Up!'s punches. Their heads are a combination of the 3/4" circle, and the small oval punches. Their eyes are made using the 1/16" circle punch. The cats' bodies and tails are made using just the small oval punch. It is all in the placement of the punch! The cats are mounted up on dimensionals too.

and PRESTO...Halloween......by punches!

Thanks for looking,
Sam.

Tuesday, 14 October 2008

More Textured Boats

I'm kinda hung up on these colours right now....and little boats....but that's a whole other story:


The background cardstock is Ruby Red, and I have stamped it with the Canvas background stamp. There is then a layer of Pumpkin Pie, which is mounted up on Dimensionals. The next layer is Soft Sky and it has been crimped.

The ribbon is from the retired Rustic Retreat Ribbon Originals pack. The two squares consist of a layer of Ruby Red then Whisper White and they are mounted up on Dimensionals.

The boat is from the 'Nursery Necessities' stamp set and is inked in Old Olive. I have stamped it off once on a scrap piece of textured cardstock before stamping it onto the Whisper White square. This results in a nice textured effect. I have also clear embossed both little boats.

Thanks for looking. Nighty night!
Sam.

Boats for Baby Boys

I was tinkering around last night, and came up with this little card:


The colours are Ruby Red, Pumpkin Pie, Soft Sky and Whisper White. The Soft Sky and Whisper White layers are textured cardstock and I have stamped the Nursery Necessities boat onto them giving the following groovy effect:


I used the Crop-a-dile to set the silver eyelets which act as portholes for the boats. The Crop-a-dile wouldn't reach the portholes on the middle boat, so I had to get out my trusty Crafter's Toolkit and set them with my hammer and punches. I had to wait until this morning to do this as I find I need to go out and do this on the concrete slab outside. When I try this inside (on a wooden floor) I seem to have 'issues' which I put down to the flexing of the floor....or perhaps I just don't hit as hard inside because I worried about the noise ;-).

The Pumpkin Pie layer has been crimped and the upper three layers are mounted up on dimensionals. The hardware is Styled Silver from the current Stampin' Up! Spring mini catalogue.

Have a great day stampers!
Sam.

Monday, 13 October 2008

I WANT A CUPCAKE!!!

I went to bed thinking about cupcakes...and I woke up thinking about cupcakes...and in the absence of any real cupcakes, I made another cupcake card using Ashley's card as inspiration again!


I used the Ruby Red and So Saffron colours with the Choc Chip this time...because they were still hanging about after Kristina's challenge!

The So Saffron DSP is from the Palette O' Prints pack that was available as part of a Stampin' Up! promotion earlier this year. The cupcake is from the Big Bold Birthday set...currently available at 20% off the retail price. I crimped the patty pan to make it look like a real patty pan.

I made some tiny choc chip sprinkles on the cupcake icing using a template and the 1/16" circle punch, then I dabbed Crystal Effects on these. There is also Crystal Effects on the candle flame, although it's pretty hard to see in the photo.


The background cardstock has been stamped using the Happy, Happy Birthday Jumbo wheel. The Choc Chip ribbon is from the Flirty Ribbon Originals pack and the 'Birthdays are the BEST' sentiment is from the 'It's Your Birthday' stamp set.

The plate is made using Stampin' Up!'s two oval punches. I needed to put the cupcake on a plate because I stuck the patty pan too far up the card...so there was this blank space between the patty pan and the ribbon. A plate filled in the space nicely IMO ;-).

Have a lovely day!
Sam.

Sunday, 12 October 2008

CASEing Cupcakes...

I have a category in my Google Reader that is for cards I want to CASE. Then, when I'm feeling a bit low on imagination I go to this list and choose one that jumps out at me! The card I made tonight is a CASE of a beautiful card by Ashley at Design With Ink.


The colours are Chocolate Chip, Regal Rose, Pretty in Pink and Whisper White. The stamp set is Big Bold Birthday. I've crimped the cupcake patty pan which I think adds authenticity. The cupcake icing is inked in Pretty in Pink and rock n' rolled in Regal Rose, then clear embossed. The two candles have Dazzling Diamonds on their flames. The ribbon is from the retired Flirty ribbon originals pack.

I'm positively stoked with how this card turned out. Thanks Ashley!

Sam.

More Unfrogettable

Last night I sat down to make another card. As I already had all of Kristina's lovely Colour Inspiration cardstock colours strewn about my work space, and my watercolouring paraphenalia and Unfrogettable stamp set still at hand, I decided another card along the same lines as yesterday's was in order ;-). SLACKER!!!!!!!!


The TV pickings weren't quite so engrossing last night. Aeon Flux.....which I've seen before...but does kinda make me wish I'd taken up gymnastics at some point. GO Charlize!

Anyhoo, this card...I used the Snail this time. Cute little guy isn't he? Not much else to say. I used Crystal Effects again, but just on the snail's shell, his eyes, and the centres of the little flowers. The So Saffron DSP is one of the sheets from the Palette O' Prints pack. I have stamped the Canvas stamp on the background cardstock. The 'Thank You' sentiment is from one of Stampin' Up!'s Rub-On packs. I am pleased with the end product!


Yesterday, a simply magnificent Spring day here in the ACT, Miss 4 and I went to visit a friend of mine and her horse. Miss 4 got to have her first ever horse meet and greet, and she had a wonderful time. She got to have a little ride too....I'll spare you the pic of me perched precariously up there on Teddy's back....let's just say I was holding on tight :-).


Have a good one!
Sam.

Saturday, 11 October 2008

Kristina's Color Inspiration #25

I have not had a chance to participate in one of Kristina Werner's colour inspirations for quite some time, but when I saw this challenge on my Google Reader last night I couldn't help myself.


The Shawshank Redemption was on telly here, and I had never seen it before, so I decide to watch it while working on this card. If you look closely at the watercolouring you will see what a large mistake that was. The movie was so good I kept getting sidetracked and stuffing up my colouring :-(


I only applied the Crystal Effects this morning, so it is still wet...and I was worried that it would kind of slide down the card while I was photographing it, but it seems to have stayed in place!


These colours were a lot of fun to work with. Very cheery indeed. I think the Hoppy Birthday frog suited this challenge very well.

Thanks Kristina!
Sam.

Thursday, 9 October 2008

Another 'Sending Happy Thoughts' card


Just another quick layout idea for the Sending Happy Thoughts Simply Sent Kit.

I have sprinkled Dazzling Diamonds on the centre of the red flower petals. Other than this I think the photo pretty much speaks for itself.

:-)
Sam.

Wednesday, 8 October 2008

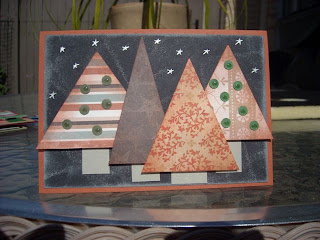
Wintergreen Christmas Trees


I've seen this idea of making simple triangle Christmas trees out of Designer Series Paper in a few places, and have been wanting to give it a go myself.

The background cardstock is Chocolate Chip and has been stamped with the Linen background stamp. The next layers are Always Artichoke, Brushed Gold, and the Whisper White.

I have cut Wintergreen DSP into triangles and then sponged the edges with Always Artichoke ink for depth. The tree trunks are Chocolate Chip cardstock which has been scratched with scissor tips to make it look like bark. The Christmas baubles on the trees are Brushed Gold cardstock punched using the 1/4" circle punch. The outer two trees are raised up on dimensionals.

The star at the top of the centre tree is stamped in Gold Encore ink and is from the 'Season of Joy' stamp set. The 'Very Merry' greeting is from the 'Short & Sweet' stamp set.

My apologies for the poor lighting in the photo. I'll try and take a better photo tomorrow...this one is quite yellow!

See you later,
Sam.

Sending Happy Thoughts - Simply Sent Kit

As you are probably aware Stampin' Up! currently has an offer, in recognition of World Card Making Day, where their Simply Sent kits are available for 20% off the regular catalogue price. This offer is valid until 11th October, 2008. If you are interested in purchasing one of these kits, send me an email at: navarino@yahoo.com

I thought I'd have a tinker with my own Sending Happy Thoughts kit, and this is the card I came up with:


Not exactly one of the two card designs that are included in the kit, but made using only the kit contents...just to demonstrate that you can make pretty much anything you like using the kit...not just the two suggested designs. I have rock n' rolled the flower, inking it in Pum pkin Pie ink first, then rolling it in Real red. The centre of the flower has Dazzling Diamonds glitter applied using the two-way glue pen.

While I was in the garden I saw this beautiful Camellia coming into full bloom. Isn't it beautiful?!


Think I might go take another look around the garden. There are a few different plants flowering at the moment, including some awesome, vibrant purple Hardenbergia, and some deliciously fragrant Lavender.

Sam.

Beate's Be Inspired Challenge #26

Beate runs lots of inspiration challenges on her blog, and I have been meaning to give one a go for ages now. With a little time to muck around, I decided today would be the day.

The challenge is to use the picture below...colours, pattern, whatever, to inspire your card:


My card took a little longer to come together than I would have liked. I got a bit overwhelmed at one point, and nearly gave it up...but came through it in the end....just ;-).


I've used Night of Navy textured cardstock for the background. Then Kraft, Whisper White, Real red, Night of Navy and Ballet Blue cardstock for the layers and embellishments. I think Pacific Point blue would have been a better bet, but we don't have it here in Oz yet. I'm looking forward to that one :-).

The circles are punched out using various Stampin' Up! punches. The stripes on the smallest Night of Navy circles are stamped on using Whisper White craft ink and the striped stamp from the 'Background Sampler' stamp set, and then embossed white. The white dashed line and 'Thank You' sentiment are from Stampin'Up!'s 'A Perfect Day' Rub-Ons set (available in our current Australian Spring Mini Catalogue).


Thanks for looking,
Sam.