Monday 5 November 2012

Dreams of a Secret Garden...


That's what these earrings made me think of while I was making them. The book...The Secret garden by Frances Hodgson Burnett. What a lovely story, and what a wonderful garden I saw in my imagination. I imagine that some of the flowers in that garden may look a bit like these fabulous floral glass focal beads by Laura Critchfield of Chestnut Ridge Designs on Etsy.
What do you think? Tangled vines and mystery? No? Well, perhaps you think Christmas, I'm with you on that too! Meanwhile, they are a little more bling for my Etsy-One-Day stash.

Hmmmm, I can smell dinner, better go and check on that. Thanks for stopping by.


Blogged to: Tricycle - Frances England, Daddy-o - Frances England and Blue Canoe - Frances England.

Sunday 4 November 2012

Punch Art Santa Candy Cane Tag


I have had a little photo from Patty Bennett's blog on my desktop for ages. It was one where she made a cute punch art Santa and used him as a topper for a licorice stick....see her post here. I thought her little Santa was just irresistibly cute, so I had to CASE him for myself. I have made a few small changes here and there, and am very pleased with how he turned out...
The hardest part was not snacking on the candy cane while I was working on Santa. The next hardest part is all the fiddly punch art sticking-down. My favourite product right now, for fiddly punch art projects, is my box of Micro Glue Dots. They measure approx. 3 mm in diameter and are great for hiding behind even the smallest punch art eyes, nose and mouth! I got my box of 325 micro glue dots from Scraptherapy, and will have to stock up on some more soon!

I have used a rectangular strip of cardboard, with two 1/2 inch circles punch in it (one at either end of the rectangle) to make a sliding holder to adhere my Santa to the candy cane. The candy cane just threads through the two holes and the Santa is adhered to the centre part of the rectangle holder. I don't have a photo, otherwise I'd show you what I mean, and I can't be bothered going back outside to take one because it is a little warm here today. We cracked 41 degrees C at 2pm! I can't say 41+ was that hard to take as I was taking a lovely little siesta at the time (under a ceiling fan and with the evap cooling going too it was lovely)....but there's no way I'm running about outside like a hooligan in it!

Enough from me. I hope that you have enjoyed your weekend!

Project Recipe:

Cardstock: Shimmery White (beard and moustache), Silver Glimmer Paper (hat trim and pom pom), Blush Blossom (face and nose), Riding Hood Red (nose), Sky Blue (eyes and Christmas greeting tag), Basic Black (pupils) and DSP (hat) (all by Stampin' Up!);
Ink: Tuxedo Black Memento (Tsukineko);
Stamps: Santa's Star (Annabelle Stamps);
Punches: Ornament (beard), Blossom Petals Builder (moustache), Blossom Trio - retired (mouth and pom pom), Owl Builder (eyes, pupils and nose), Scallop Oval (hat trim), Extra-Large Oval (hat), Medium Oval - retired (face), 1/2 inch Circle (holder to affix Santa to cany cane) and 1 1/4 inch Square (to create the banner end on the greeting tag).
Accessories: D'Vine Swirl Embossing Folder (Provocraft), Micro Glue Dots (Glue Dots) and Dimensionals (SU).


Blogged to: Money for Nothing - Dire Straits, She Drives Me Crazy - Fine Young Cannibals, St. Elmos Fire - John Parr and Nothing's Gonna Stop Us Now - Starship.

Friday 2 November 2012

Bits 'n Pieces...


Not feeling all that much craftin' love right now...but I've pulled out all stops to come up with a little something quirky to pop up here, just so you know I haven't abandoned my blog.

I have been thinking about lady beetles a lot lately. This is mainly because we seem to get quite a few of them up here, and I do like their polka-dotty cuteness.  So Dotty the lady beetle it is...
I have included the second shot, because I think you can see the pearlex that I have used for Dotty's cheeks and dot highlights. I just applied it dry with a sponge dauber....so it'll wipe off pretty easy (and messy), but I do like how it shines.

Now for a few other random pics...
Beautiful Standley Chasm
The wall behind me is COVERED in flannel flowers....just beautiful!

...and last but not least, Miss 8 - ready for her very first time trick or treating. Halloween is big up here!
Watch out Forks...there is a scary new vampire in town, and she's messy!


Friday 26 October 2012

Wine Glass Taggies...


I have no idea what the technical term is....wine glass tags, wine glass markers? The doovers you put around your wine glass stem at a party so you don't lose your drink. You get the gist, no? Well, on one of our recent 41+ degree days I was sitting and fiddling with my wine glass stem (as you do) and I decided I'd make some for myself (taggies, not wine glass stems). I have a stash of cheap, multi-coloured foam sheets here, and it works very well in the Cuttlebug. So I got to playing, and hey presto! My very own stash of wine glass taggies...
Don't get excited. The drink is just Bickford's Lemon, Lime and Bitters Cordial, with mineral water and ice. I shouldn't say just....it is delicious on a hot day, and regardless of what is actually in the glass....you don't want to lose it!
I know the colours do not look significantly different, but in real life I think your guests will work it out, well....as long as they haven't indulged in too many apéritifs ;-).
I used one of the Annabelle Stamps Cuts by Design - Shapes 1 dies to cut out my taggies, followed by one of the small circles from a set of Spellbinders Nestabilities Circles. I align the small nestie circle in the centre of the tag (using my Mach-1 eyeball) and stick it down using Washi tape, which you just peel off after it has been through the Cuttlebug. I hand snipped the straight-line cut in the side of the taggie.

You could use pretty much any shape die you wanted. I'm thinking I'll make some floral ones too. I think a set of these would make a cute little budget Christmas gift. What do you reckon?
This handmade Christmas gift box is decorated using the Annabelle Stamps Cuts by Design - Borders 1 die. The tag is cut using one of the Annabelle Stamps Cuts by Design - Decorated Christmas dies and stamped using the matching Decorated Christmas stamp set. Easy peasy lemon squeezy!

Have a good one :-).


Blogged to: All My Children - The Vampire Diaries (Season Three).

Monday 22 October 2012

Feeling some déjà vu?


You have seen this one before! At least, something a lot like it. I made a second card using that design, made a few small changes et voilà! I like it just as much the second time around.....all bright and sunshine-y :-).....which is in no way meant to upset those of you who are suffering through rain and cold (and I know there are a few of you out there). Fingers crossed your skies clear soon!

I have used Boys Party and BBD5 stamps, Shapes 1 and Borders 1 Cuts by Design and Light Blue Hemp Twine......all off which are by Annabelle Stamps. The yummy cardstock is all Bazzill Card Shoppe which I bought from Willow Paperie.

This card was delivered via camel with a l'il something included too...

....the earrings, not the sherry glass. Just a little bit more bright, sunshine-y-ness, in case the card wasn't enough ;-)!

At the risk of really upsetting those of you who are cold and wet, I am going to include one little pic that makes me smile (and FYI....Thumper was cold and wet too, even though it was 39 degrees C!).

Well, it has been a loooooong day. Miss 8 had a big bike stack on the weekend, and in addition to a chipped tooth and multiple grazes on her chin/face/hips, an xray of her jaw shows a possible small crack/fracture. There is no movement on the crack though, in fact it does not appear to go right the way through so for now we are eating only mushy foods with as little chewing as possible...and avoiding all collisions too! Wish us luck.


Blogged to: We Will Rock You - Queen, Gloria - Laura Branigan, Turn to Stone - Electric Light Orchestra and Til Death - Wynter Gordon.

Sunday 21 October 2012

Annabelle Stamps - Springtime Flowers Challenge


Annabelle Stamps has another of their great monthly challenges on, and the one for October is - Springtime Flowers - there is even a $20 voucher in-store up for grabs:


You can see more details about the challenge on their Stamp Embellish Create page here.

And here is my creation...
Did you notice that I have used the gorgeous Annabelle Stamps Cuts by Design: Borders 1 as a real die this time, and not just to emboss with?! I have also used stamps from the Annabelle Stamps BBD - 6, Decorated Christmas and Fanciful Flowers stamp sets, as well as some Purple Hemp Twine for the flower petals.

This time my card colours were inspired by another recently completed pair of earrings (whose colours don't look great in these pics...might have to try again later when the light is better):
Thanks for visiting and have a lovely day :-)!

ETA: Better colours?


Blogged to: 1999 - Prince, Spectrum (Say My Name) - Florence + The Machine, How Far We've Come - Matchbox Twenty and Sweet Nothing - Calvin Harris.

Saturday 20 October 2012

Just Add Chevrons


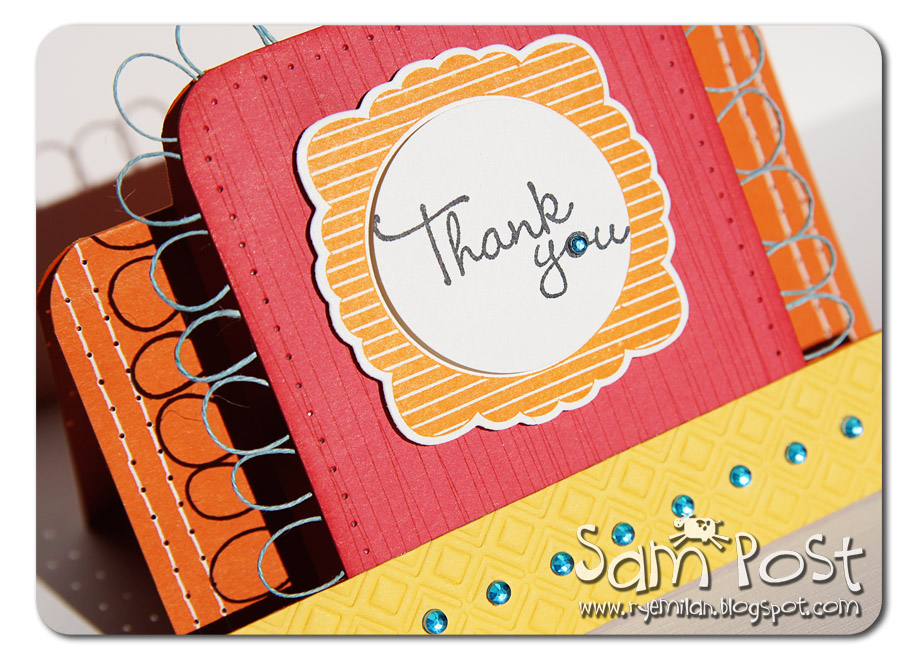
I was very happy to see this week's challenge at Just Add Ink. The challenge was to Just Add Chevrons and, for once in a long while, I felt up to this challenge (and besides, chevrons really appeal to my sense of symmetry, or something...).

This said, there is still a very large pile of mess on my desk. From previous experience I can tell you that the size of the pile of mess on my desk is proportional to how much trouble I had making the card, i.e. small pile of mess = the card came easy, no blood was spilled......large pile of mess = I had to extract the card tooth by painful tooth. I am just not finding card-making very easy right now, and it is ticking me right off (vicious circle perhaps?).

Anyway, frivolous ramblings aside....the card has been extracted, the deed done...and here 'tis:

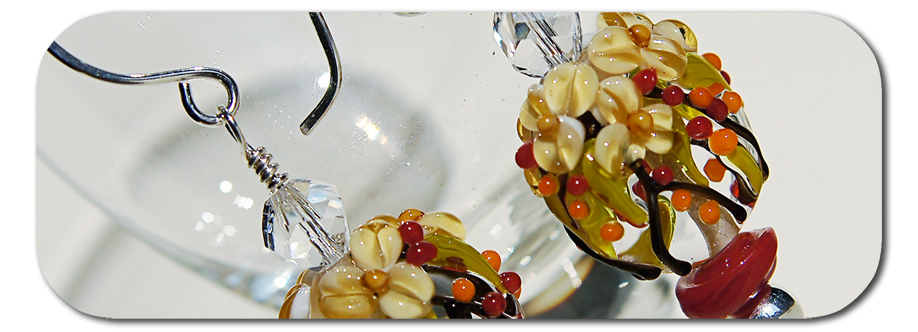
Painful though the process was, I am still pleased with the end result. It feels like a fun card to me. As I put the finishing touches on it I noticed that it complemented another pair of earrings I made during the week, similar to Kim's birthday earrings, just with a different Swarovski crystal above the dotty beads.
...and while I'm on the subject of earrings, thanks so much for all the lovely comments on the last pair....your feedback is very much appreciated!

Have a wonderful Saturday...I'm going to go dip my toe in the pool and see how it feels. We've been having a delicious heat wave here, and it looks like it will go on for a few more days yet....37-39 degrees C for the fifth day running and headed for 40 on Tuesday!

Project Recipe:

Cardstock: Summer Sun, Tangerine Tango, Whisper White and Kraft (SU);
Ink: Summer Sun and Tangerine Tango Classic Inks (SU) and Tuxedo Black (Memento);
Stamps: Decorated Christmas, Fanciful Flowers, BBD - 5 and Stemmed Flowers (Annabelle Stamps);
Punches: 3/4 inch circle and Five Petal Flower (SU);
Accessories: Chevron Dies (MFT), Patterned Papers (KaiserKraft), Textured Embossing Folder (SU), Paper Piercer (misc), White Gel Pen (misc) and Dimensionals (SU).


Blogged to: Bust a Move - Young MC, Psycho Killer - Talking Heads, Babooshka - Kate Bush and Eye of the Tiger - Survivor.

Wednesday 17 October 2012

Crystal Clear Ocean Waves...


I made these ocean-themed earrings recently (do you think I'm missing the water much ;-) and I thought you might like to take a little peek too!
The beautiful glass focal beads are by Candice Mathewson of Beadgoodies on Etsy. The crystal tear drops are by Swarovski and the silver is all Sterling.

I am adding these earrings to my small pile of things to sell one day, maybe.

Wordy post tonight hey? I'm off to bed. Soooooo sleepy!
Thumper Discovers Nature


Monday 15 October 2012

Christmas Bauble


I worked on a Christmas card over the weekend. I had a few comments here at home which confirmed my belief that it wasn't one of my finer achievements, but you get that! I took note, made an adjustment or two, and voila...
I love the colour combo, and enjoyed quietly tinkering with some of my new toys!

While I'm here, I thought I'd also point out that I have again used the gorgeous Annabelle Stamps: Cuts By Design - Borders 1 die to emboss rather than using it to create a die cut. I really love the intricate embossed pattern that it creates, but will endeavour to use it as a die next time I get it out :-)!

Project Recipe:

Cardstock: Elegant Eggplant, Cherry Cobbler and Brushed Gold (SU);
Ink: Elegant Eggplant and Cherry Cobbler Classic Inks (SU);
Stamps: Decorated Christmas (Annabelle Stamps) and BBD - 6 (Annabelle Stamps);
Dies: Cuts By Design - Decorated Christmas (Annabelle Stamps) and Cuts By Design - Borders 1 (Annabelle Stamps);
Accessories: Purple Hemp Twine (Annabelle Stamps), Gold Leaf Pen (misc), Washi Tapes - various (Washimatta), Gold Cord (SU) and Gold Wire (SU).


Blogged to: Around the World - Daft Punk, Beautiful Day - U2, In The Night - Pet Shop Boys and Walk This Way - Aerosmith and Run-DMC.