Tuesday, 7 July 2009

Enchanté


I've recently made a decision to USE some of my older, retired Designer Series Papers (DSP), rather than hording it endlessly for the proverbial rainy day. So, when I recently needed some purple-toned paper to make a box and card, I immediately thought of the pretty Enchanté DSP (from the Summer 2007|2008 Stampin' Up! Mini Catalogue).


The ingredients (all from Stampin' Up! unless otherwise noted):

Cardstock: Basic Black and Whisper White
Stamps: On Your Birthday
Ink: Black Stazon
Accessories: Enchanté Designer Series Paper (retired), True Black Luxe Satin Ribbon (Papertrey Ink), Clear Rhinestones (Kaiser), Eyelet Border punch, SNAIL adhesive and mini glue dots.


The beautiful beads are handmade glass lampwork lentils by Terry of Silverfish Designs on Etsy. I really love the unusual shapes, patterns and colours that Terry works into her beads. They are truly unique!

While I am here...I wanted to show you how the cake that I was making yesterday turned out:


It is an Orange Poppyseed cake, and for a packet mix it tastes pretty good!

Better go bring in the washing before it gets damp again (and yes, by 2 in the afternoon, it is almost damp again...BRING ON SPRING!!!!!!!!! :-).

Thanks for dropping by.
Sam.

Monday, 6 July 2009

Chocolates from Kim!


Saturday night was my friend (and new downline) Kim's first workshop as a Stampin' Up! demonstrator, and she invited me along to join in the fun. She did a wonderful job, and it was very relaxing not to be the one in the 'hot' seat for an evening ;-).

I just wanted to show you the lovely thank you card and gift that Kim gave me on the night:


Aren't they STUNNING? The chocolates were originally in a cello bag inside the fold out pack on the right. I simply adore the card. Kim made a similar one with different colours a little while back, and you can check it out on her blog here. It is such a groovy idea. Kim has used one of the tree patterns from Funky Trees to create the dots on the flower, and they are all embossed mind you. The faux ric-rac flower stem that she has created using the scallop border punch is so pretty. Kim's attention to detail is second to none. Thanks so much Kim!! (PS. The chocolates WERE very yummy ;-).

Also, while we were all outside yesterday, catching a few weak rays of sunshine, my daughter and I decided to check on some of our little carrots. We pulled up a few and were very pleased to see that they looked good. A little crooked and wonky, but carroty-looking nonetheless!


As my daughter pulled one carrot up she exclaimed...'LOOK MUM! It's a carrot with Dancing-Legs!!'...I laughed:


It IS a carrot with dancing legs!! I love how they come up with such apt and descriptive names for things.

We don't know why our carrots grow in these crazy shapes. If you have any words of wisdom on the carrot growing industry, we'd love to hear from you :-).

Have a lovely start to your week! I am going to hang some washing up and get a little cake out of the oven now.
:-)
Sam.

Sunday, 5 July 2009

Traveler's Inspiration Challenge:{one}


One of my favourite bloggers, Tina of Travelingmama has started her own creative challenge...the Traveler's Inspiration Challenge.

First, I want to say a huge thanks to Tina because I think this is a fabulous idea. I love looking through my photos of trips abroad....it is one of the reasons I've been posting those clips from allposters...I like looking up places that I have been and seeing how other people have captured their beauty/mystery/allure.

The first challenge photo is a stunning combination of colour and design...not to mention the texture of the bling!


I found it very inspiring, and as I first saw it while sitting up in bed on a Sunday morning...I immediately thought of slipping my feet into a pair of those dainty little slippers and frolicking around the house (luckily I don't have any, so the neighbours were spared that spectacle...but you, on the other hand...now have the visual firmly planted in your head...don't you? Sorry ;-).

I did eventually leap out of bed, and went hunting through my beads, microbeads, glitters, bling and In Colours...they ALL wanted to play. In the end I limited myself to glitters...but I did use LOTS ;-).


List of Ingredients (all available from Stampin' Up! unless otherwise noted):

Cardstock: Kiwi Kiss plain cardstock and Whisper White textured cardstock
Paper: Bella Rose Designer Series paper
Accessories: Bright Delights rub-ons, Sweet sticky cuts, Fine Supernova Stampin' Glitter, Fine Cosmo Stampin' Glitter, SNAIL adhesive and dimensionals.


I must say that I good part of today's renewed Craftin' enthusiasm comes from having attended a fun workshop last night (thanks Kim!)...but more on that later ;-).

Have a wonderful day, wherever you may be in the world!

Sam.

PS. I have been meaning to say a very big thank you to everyone who left such lovely commments on my last two posts. You are all very sweet!!!

PPS. I have also been meaning to explain the lack of watermark and photoshopping of many of my more recent images...as you may remember, my laptop expired some time ago, and now I am using my husband's. He does not have Photoshop on here, and I do not have easy access to most of my files anyway (like watermarks etc). Its getting old real quick...but what can a girl do? PLEAD for mercy, BEG forgiveness and GROVEL for a replacement powerboard? It won't be happening any time soon I'm afraid :-(.

Monday, 29 June 2009

Urban Garden Flowers


I think I have described my scrapbooking process before. My pages take a long time to come together. This page has been out on my dining room table for almost two weeks. This is how it started...a quick sketch, made one night during ad breaks while watching NCIS the week before last:


After a week of umming and ahhhing, trying colours and then changing them, moving the flowers, moving the leaves, moving the butterflies, moving the photos...this is the final product:


I LOVE how the bottom two thirds of the page came together (it feels like a secret garden), but I think I've missed the mark in the top third. The photos are cute, but I'm not at all convinced that the layout of the photos matches the rest of the page (the fact that they are stuck on crooked probably does not help my analysis here ;-). Aside from this, I'm feeling pleased. It was definitely worth the time and effort, and I had FUN!! I have blurred some personal text from under the four images (that is the black dotty stuff). The images are of my daughter at 1 week, 1 year, 3 years and 5 years old. I used colour images, and applied Pioneer Woman's (aka Ree Drummond) 'B&W Beauty' Photoshop Action from Action Set 1 (scroll to the bottom of the post HERE for a link to these actions).

List of Ingredients (all from Stampin' Up! unless otherwise noted):

Cardstock: Kiwi Kiss, Baja Breeze, Basic Gray and Not Quite Navy plain cardstock, Whisper White textured cardstock
Stamps: Flight of the Butterfly and Inspired by Nature
Ink: Kiwi Kiss, Baja Breeze and Basic Gray Classic Ink
Accessories: Urban Garden DSP, On Board Lots of Letters, On Board Batch of Blooms, Flower Designer Brads, Button Bouquet Designer Buttons, Hemp Twine, Kaiser Clear Rhinestones (you could also use the SU Clear Rhinestone brads, as brads or with the rhinestone removed from its setting), White Vellum Cardstock, crystal effects, edge distresser, dimensionals, glue dots, sticky strip and SNAIL adhesive.

I have another 12 x 12 sketch here...so hopefully I'll get to work on that one soon too. I am pleased to be back on the scrapbooking track...it means a lot to me, and my husband loves looking at the pages, which is very nice.

Another www.allposters.com moment:

Amalfi Coast, Coastal View and Village, Positano, Campania, Italy


Have a great week.
Sam.

Monday, 22 June 2009

Once Upon A Time...


...there was a beautiful little princess who loved to dress up...and so the journalling goes.

This is the page I made using the photoshopped image from here:


I am very pleased with how it turned out. It was a lot of fun to make, and has inspired me to do more scrapbooking.

There is a journalling panel hidden behind the photo. The finished version also has some name and date text written down the right hand side of the photo, on the Baja Blue background, using a white gel pen.

Ingredients:

Cardstock: Baja Breeze and Close to Cocoa textured cardstock, Kiwi Kiss, Tangerine Tango and Whisper White cardstock.
Ink: Kiwi Kiss, Tangerine tango and Close to Cocoa Classic Ink
Stamps: Once Upon a Time
Accessories: On Board So Tweet, clear rhinestone brads, Stampin Sponges, Haikou and Kiwi Kiss Patterns Designer Series Papers, white DMC embroidery thread, sanding block, round tab punch, white gel pen, mini glue dots, SNAIL adhesive and sticky strip.


Hope you are having a fun day!
Sam.

PS. Edward says to say hi from sunny Canberra!

Saturday, 20 June 2009

Beary Special Bears...


Just another little child's birthday-type card I have made using one of the Taylored Expressions stamp sets, Beary Special:


The layout is nothing special...I was just playing around (still feeling a bit mojo-itis-y), and out popped my usual symmetrical affair, adorned with layer upon layer upon layer...

What I used to make this card:

Stamps: Beary Special by Taylored Expressions
Cardstock: Kiwi Kiss Textured cardstock, Riding Hood Red and Whisper White plain cardstock
Ink: Memento Tuxedo Black
Accessories: Pink Flamingo Designer Series Paper, Eyelet Border Punch, Kiwi Kiss Striped Grosgrain Ribbon, Copic sketch markers (see image below for colours), Button Bouquet Designer Buttons, DMC green embroidery thread, Eastern Elegance Rub-ons (retired), edge distresser, SNAIL adhesive, Dimensionals and Sticky Strip.


Just a quick word or ten on Copics. I have used the list provided by Cher Bapp here to convert Copic Colours to Stampin' Up! colours. The colour comparison business is a subjective one, so be aware there are many other lists available out there too.

Also, I have found a good place to buy Copic Sketch markers online within Australia, the RMIT bookstore. If you become a member of the co-op ($10.50 for life membership, and you can join when you place your first order), the Copic markers cost $6.12 each, and they charge a flat rate shipping of $5 for as many markers or refills as you like.

This is the best price I have found online. RMIT don't currently have all colours in stock, but they are expecting a shipment in a couple of weeks, and are going to email me when it comes in. You will note that I have used Copic Original markers on occasion...this is all I could find over the counter in the ACT, but you end up using a fine nib to colour with, which is not as nice as the brush end of the Copic Sketch markers (IMO).

Hope you are having a cruisy weekend!
Sam.

Wednesday, 17 June 2009

Some Pioneer Woman Photoshopping


I think I've mentioned Ree Drummond's fabulous website before, and her wonderful Photoshop Actions. You really should check them out, they are great, and they are FREE!

Last week, in the course of designing my scrap page for this weekend's workshop (there are still spaces if you are keen), I decided I needed a special photo to go with the page (which I'll show you after the workshop ;-).

This is the photo I chose:
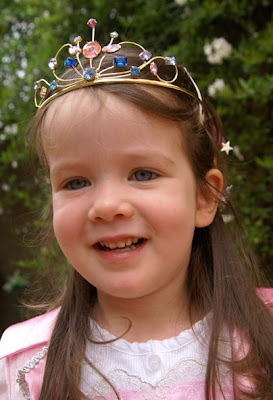

This version is straight out of the camera, which is a Sony Alpha 100, and I was using a Minolta 28 - 75 mm lens. All I have done to it so far is cropped it to centre Miss (then) 3 in the frame.

The colours did not match the DSP that I wanted to use on the page (isn't it always the way?), so I decided to try it in black and white. I used Ree's 'PW B&W' from action set 1, and this is what I got:
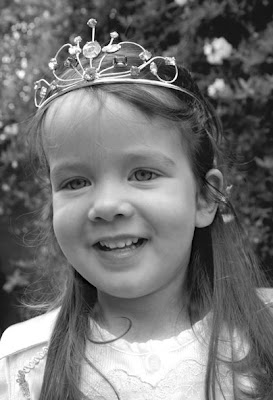

I might mention here that I can't remember if the entire action ran correctly...I am only using Photoshop 7.0 for Mac here, and it says that Ree's actions are for CS3 or CS4. Some of the steps don't run and I get an error message, at which point I usually just skip to the next step and restart the action (Ree would possibly groan in horror, but I am usually at the outer limits of my photoshop savy, just trying to get the action to run in the first place.....I am not quite up to manually getting through the steps...yet)!

I have lightened the eyes a bit by copying the layer, and lightening it, then putting it at the back, and erasing over the dark eyes, so the lighter eyes showed through. I will eventually try Ree's latest tutorial though, where you use a layer mask to do this instead, so that you can go back and make changes.

You will also note that I have removed the white clip and the little white star from the upper right-hand side of her head (wardrobe malfunctions...Janet is not the only one with problems you see).

Ok, so I spent a while on this little number, printed it out, held it up to the scrap page and DOH! It still wasn't what the page needed. It needed SEPIA!

Back to Ree's actions, and the first Sepia-ish one I see is 'Heartland', from action set 2. This is what came out:
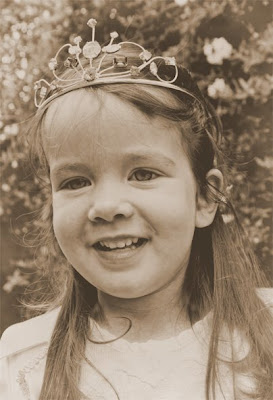

I think it is a stunning effect! So pretty, and 'ye-olde-photo found in the bottom of great grannies sea-going trunk in the attic' IYKWIM? I have printed this one out, and have it by my bed. I've been looking at it and thinking Miss (then) 3 wouldn't look out of place in a European royal family! Maybe just a tad too happy looking for royalty ;-).

I also tried the straight 'Sepia Tone' action, also from action set 2, and this is the result:
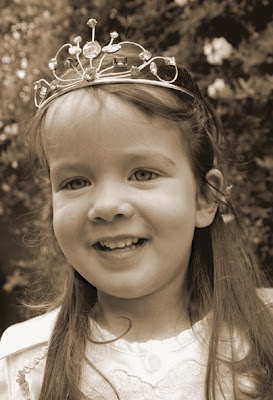

This is the version that I ended up using on my page. Nice as Heartland was, vintage wasn't quite what the page called for (IMO). This said, a vintage page is now on my list of things to do....and I can't wait to play with Heartland some more!

When I grow up, I want to take photos like the Pioneer Woman, she is my hero :-). Thanks for your fabulous photoshop resources Ree.

Have a great day,
Sam.

Monday, 15 June 2009

A Tilda Thank You


Recently, the lovely Bec from Bizzy Becs sent me some of her new furniture images and Tildas to have a play with.

This is the card that I made using the image over the weekend:


It took a long time to come together (I have cold-induced mojo-itis ;-), but I was pleased with the end result.

Here is a full list of the materials that I used:

Stamps: Bizzy Becs Furniture Collection - Dining Chair, Magnolia Stamps - Tilda with Heart and Stampin' Up! Level 1 Hostess Set Best Yet
Cardtsock: Always Artichoke, Whisper White and Glossy White
Ink: Chocolate Chip, So Saffron and Close to Cocoa Stampin' Up! Classic ink
Accessories: Windsor Knot Designer Series paper, Theatre Ribbon Originals (retired), COPIC markers (see image below for the colours), small and large square punches, dimensionals, SNAIL adhesive, sticky strip, glue dots and craft knife.


Inspiration for the way I have scored and sponged the glossy white cardstock (which is at the bottom of the card, in the background), came from a swap card that I received at Convention from a fellow demo, Leanne Dixon...thanks Leanne :-). I had mean't it to look like a half panelled wood wall, with wallpaper at the top, but after looking at it on here, it kinda looks like the wood is on the floor. Hmmmmmm, you get that!

Thanks for stopping by!
Sam.

PS. More www.allposters.com eye candy for cold people ;-):

Sault - Provence
Sault - Provence


Hmmmmmm, I can almost smell it!

Thursday, 11 June 2009

This bracelet makes it feel like Spring!


...ok, in tandem with the 'puter blowing itself up, the ol' cardmaking mojo appears to have gone out in sympathy. Or maybe it is just frozen onto the inside of my skull and can't detach itself right now.

In the absence of anything papercrafty to show you, I thought I'd show this bracelet I recently made, using lovely bright lampwork beads made by the very talented Jelveh of Jelveh Designs:


What do you reckon? Does it make it feel like spring for you? I'm thinking of Strawberry Daiquiris by a pool :-). I know I'm getting ahead of myself here (seasonally speaking)...but you have to have something to hold onto...don't you? ;-).

It must be nearly time to go make dinner...

Have fun!
Sam.

PS. The green on the beads is a sort of Certainly Celery...my flash has kinda washed it into the lemony spectrum...but its not. Just thought you should know. Ciao Ciao!

So Tweet Scrap Class


Hello!

Sorry for being MIA for so long. My computer died last week. Well, hubby said the powerboard died...he actually said it was smoking. I must have given it a real run for its money eh?

Anyway, now I'm personal 'puter-less. I've been using hubby's machine, but none of my stuff is on it. All my site passwords were stored on the other machine. All my photos, templates, my calendar - my life (BOO HOO) etc...and besides, he is always wanting this one back at inopportune times...so I'm feeling kinda adrift, IYKWIM? On the bright side, I have read a number of books in the mean time. I'm getting to be quite the Clive Cussler fan. But I digress...

I just wanted to let you know about a Scrapbooking class that I will be holding at my place soon. Here are the details:

SO TWEET SCRAP CLASS

DATE: Saturday 20th June
TIME: 1:30 pm - 4:30 pm
WHERE: Canberra (southside) - my place
WHAT: A class where we will make one 12 x 12 scrapbook page, using techniques such as: applying DSP and ink to chipboard, stitching, tearing, and paper piecing. The page will have room for one 6 x 4 (or smaller) portrait orientation photograph which you can attach after the class. There will also be space for journalling on a concealed slider panel.
COST: $16 per person covers all materials, including SNAIL adhesive and afternoon tea.

If you are interested drop me a line on navarino@yahoo.com and I'll save you a seat. The image at the top of the post is a little look at what you'll be doing.

Ok...gotta run.

Hope you are well...and staying warm.....BBBBBBBrrrrrrrrr its cold here today.
Sam.